Infinite buttons!
The new Button Editor has just been released. As of now, this feature is the longest feature in development.
This editor allows users to create their own buttons with custom colors gradients and icons.
This is now included in the newest version of LittleLink Custom and turned on by default. The custom and custom website button can be customized to fit any link.
To use the Button Editor, add either a custom or custom website button on the User Panel under ‘Add Link‘. You can now customize your button on the ‘Links‘ section by clicking on the ‘Customize Button’ prompt next to your button of choice.
Now the Button Editor UI will open, and you can unfold your creative spirit.
The Button Editor is segmented into three parts:
- The first part is for customizing the colors of your button
- The second part is the ‘result’ button preview
- And the third is for changing icons
These section can be considered as separate parts, meaning you should always save before continuing to the next section.
The first part consists of the color picker, a live preview, a CSS section and submit buttons.
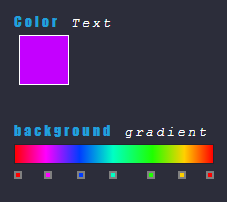
With the color picker, users can change the text and background color of their buttons.
The background color can either be a gradient or a single color can be selected. Multiple steps can be introduced to allow for multiple colors on one button, the default option is two colors.
Below the live preview, users can edit CSS code manually by expanding the CSS section. This allows for further customization options, but is probably only useful for more experienced users.
Below the section are two buttons titled: ‘Submit’ and ‘Reset to default’. The Submit buttons applies your color changes and the Reset button restores the default values.
The color picker is currently only one-directional. Once saved, the color picker resets to the default values, meaning once applied you won’t be able to edit your color choice unless you recreate them from scratch.
The second section is a preview of your button as it would display on your littlelink page. This button shows your custom icon and color choices, but only updates once changes are applied by pressing the submit button.
The last section is for customizing your button icon. Icons are added via the Font Awesome library with over 2000 available icons. If you have ever used Font Awesome before, you won’t have any problems here, and for everyone else a description is provided below the icon selection field.
By default, an icon is already entered into the field. You can change this by replacing this icon with any icon you would like. By default, the icon color is the same as the text color chosen with the color picker, but you can change the color of your icon independently by adding the color in front of your icon short code followed by a semicolon. Detailed instructions for this can be found by expanding the ‘Details’ section.
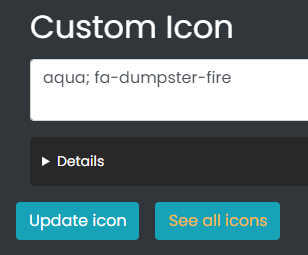
You can apply your changes by clicking on the ‘Update icon’ button. All available icon short codes can be found by clicking the ‘See all icons’ button.
With all this, you can essentially create an infinite amount of buttons to create a matching button for any link you could have.
Download this new release
Epilogue:
This solution is far from perfect. I really don’t like dealing with JavaScript of any kind.
In future revisions, I would like to include a slider to change the angle of the gradient, this can currently only be done by editing the CSS manually.
I will experiment with button presets and depending on how far I will get I might implement something like this in the future.